How to Hang and Install Large Building Banners Using the Rigid Flex Banner Tensioning System

Step-by-step guide for professionals: learn how to install large vinyl or mesh banners using the Rigid Flex system, from planning and tools to safety, materials, common pitfalls, and interactive checklists—plus diagrams, and a downloadable PDF.
What You’ll Learn
-
Product overview and components of the Rigid Flex Banner Tensioning System
-
Suitable banner materials (heavy-duty vinyl, mesh, blockout)
-
Tools and equipment required
-
Detailed installation process with diagrams
-
Critical building considerations and safety tips
-
Common mistakes and how to avoid them
-
Maintenance best practices
-
Interactive checklist and downloadable PDF version
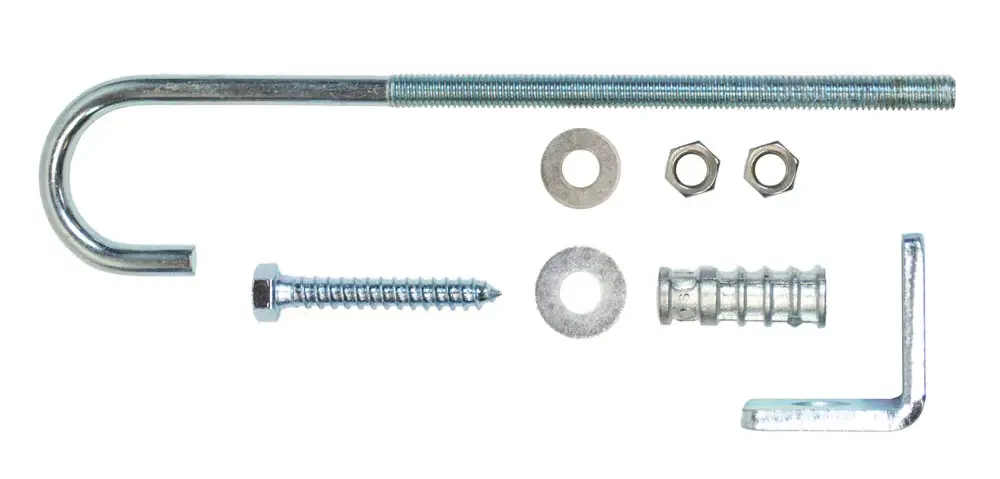
Product Overview
The Rigid Flex Banner Tensioning System by United Sign delivers a secure, taut frame for large banners. Each kit includes:
-
10″ or 4.5″ aluminum J‑Hook with nuts and washer
-
3/8″ cement expansion lag anchor with lag screw and washer
-
2″ heavy-duty 90° angle bracket
-
Supports drum-tight installations using 1″ conduit in the banner pocket
-
Compatible with vinyl and mesh banners
-
Options for 8″ or 2.5″ lateral adjustment per side, with half the cost of other framing systems
Compatible Banner Materials
-
PVC vinyl (13–18 oz) – strong, vibrant, and durable
-
Mesh vinyl – allows airflow, less wind load
-
Blockout vinyl – ideal for double‑sided print, prevents bleed-through
-
Finished with hems and pole pockets – essential for rigidity in the Rigid Flex system
Calculating How Many Tensioning Brackets Are Needed
When planning your installation, it’s critical to determine the correct number of tensioning brackets to ensure the banner stays evenly tensioned and secure. The general rule of thumb with the Rigid Flex Banner Tensioning System is one bracket for every 4 feet of perimeter, plus additional brackets at each corner for extra support.
For example, if your banner is 12 feet wide and 24 feet tall, you would calculate the perimeter as follows:
12' + 24' + 12' + 24' = 72 feet total perimeter.
Divide this by 4 to get the number of intermediate brackets:
72 ÷ 4 = 18 brackets.
Then, add 4 extra brackets for the corners:
18 + 4 = 22 total brackets needed.
Spacing should be evenly distributed along each side, so tension is consistent across the entire frame. Proper spacing prevents sagging, minimizes stress points, and ensures a clean, drum-tight finish.
Installation Diagram
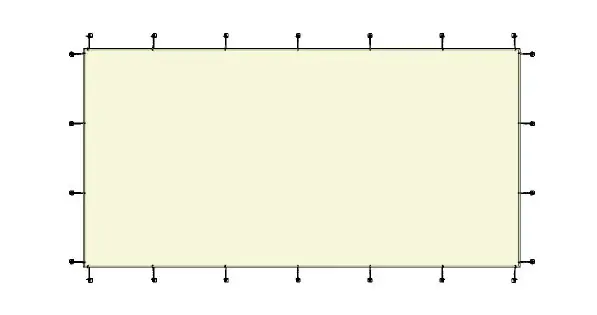
-
Each side: level the rails, install J‑hooks and mount anchors → clip in banner edges → tension → check corners
-
Corner alignment is crucial for clean edges
Tools & Equipment Needed
-
Cordless drill with masonry & metal bits (Rotary hammer drill)
-
Cement anchors or self-tapping screws
-
Level, tape measure, chalk line, screwdriver set
-
1″ conduit or pipe (for banner pockets)
-
Soft mallet
-
Ladders, scissor/boom lifts, and full fall‑protection systems (OSHA‑compliant)
Step-by-Step Installation
1. Site Prep & Assessment
-
Verify building surface strength (brick, concrete, structural metal)
-
Avoid light siding; fix degraded walls first
-
Mark corners and level chalk lines for the frame
2. Frame Setup
-
Pre-drill holes using correct bit
-
Secure horizontal rails, then vertical rails
-
Use level and square attachments before tightening
3. Banner Attachment & Tensioning
-
Slide 1″ conduit through banner hems
-
Attach to J-hooks: begin at one corner, work around perimeter
-
Use mallet to seat tension clips
4. Final Inspection
-
Smooth out wrinkles
-
Tighten any loose clips/anchors
-
Ensure no protruding hardware remains
Building Challenges & Pitfalls
-
Light, hollow siding may deform under load → avoid or reinforce
-
Cracked/bricked surfaces risk anchor failure → repair mortar first
-
High-wind areas → use mesh banners
-
Incorrect anchor spacing or misaligned frame = sagging/wrinkling
🛡️ Safety & Maintenance
-
Use harnesses and secure lifts (OSHA-compliant)
-
Perform post-install inspections (after storms and every 3–6 months)
-
Clean banners gently and inspect clips for corrosion, replace if necessary
Interactive Installation Checklist
| Task | Complete |
|---|---|
| Confirm substrate is load-bearing (brick/concrete/metal) | ☐ |
| Repair weak/damaged areas before installing | ☐ |
| Measure and mark banner area using chalk and level | ☐ |
| Pre-drill anchor holes with correct bits | ☐ |
| Install top and bottom rails level and square | ☐ |
| Clip banner edges into tension system, corner to corner | ☐ |
| Use soft mallet to seat tension clips | ☐ |
| Smooth out wrinkles and adjust tension evenly | ☐ |
| Secure all anchors and check hardware for hazards | ☐ |
| Inspect post-install at 3–6 months or after weather events | ☐ |
📄 Downloadable PDF
Use this as a shareable guide or on-site reference:
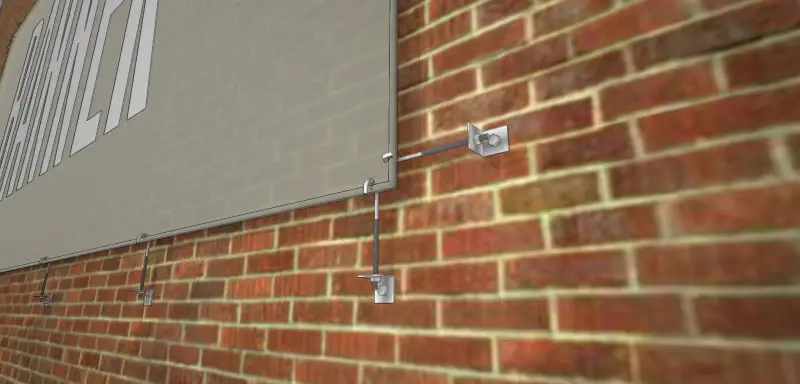
Examples & Photos and things to Watch For
-
Consistent drum-tight finish on brick facade
-
Even clip alignment and proper conduit placement
-
Signs of anchor pull-out or banner stretch over time
-
Use mesh banners in windy conditions for air relief
Video
Include a short demo video such as: "Rigid Flex™ – Banner Tensioning System" for visual reinforcement
🧭 Summary
This article empowers you to lead your clients through a flawless large building banner installation using the Rigid Flex Banner Tensioning System. It’s designed for clarity, ease of use, and professionalism—complete with diagrams, checklist, safety guidelines, and a handy interactive PDF. Simply copy, paste, and publish it on your knowledge base for immediate value.

Leave a comment